Hackday: Keynote!

At least once a year, we have a Scribd “Hack Day”.
Everybody picks something they really want to work on, and then we hack for 24 hours straight.

It’s always a lot of fun- there are treats around the clock (ice cream deliveries, a Crêpe cart and and a specially stocked snack bar), and if you’re still around (and awake!) during random late-night “raffle hours”, you get a raffle ticket. (Prices were, among others: a Kindle, a jalapeno growing kit, a rip stick, a flying shark)

Our last Hack Day was March 29st 2013, with the following top #5:

  1. Jared’s In-Doc Search (17 votes)
  2. Matthias’ Keynote Conversion (12 votes)
  3. Jesse’s ScribdBugz (10 votes)
  4. Gabriel’s Bounce Analytics (9 votes)
  5. Kevin’s Leap Motion Navigation (6 votes)

We’re proud to announce that we now open sourced some of this work: The Scribd Keynote converter, by now running in production for us, is open sourced and available from http://github.com/scribd/keynote .
Keynote is Apple’s presentation format, and the above project enables you to convert it to PDF on non-Mac systems.

Open sourcing keynote follows in the footsteps of many of our open source contributions- see http://github.com/scribd/ for our other projects.

Happy Hacking!

Compete Against Our Developers!

We think we’ve invented a new game. Imagine a grid with fruit scattered upon it.
game screenshot
There are two robots that start on the same cell. Given simultaneous turns, they decide if they want to move or pick up the fruit from the cell they’re standing on. They are told where all the fruit are, what the score is, and where both bots are every turn. The objective of the game is to win as many fruit groups as they can. To win a fruit group, they need to have picked up the most of that type of fruit. Ties can happen when both bots decide to pick up the same piece of fruit on the same turn.

Our developers have created some bots and we challenge you to create a bot to beat them. Bots are written in Javascript. Our backend servers will throw each bot into a sandbox. When we are ready to begin a game, we notify the bots and allow them to access information about the board. At each turn, we call their make_move functions to find out what they want to do. (Details can be found in our bot api.)

To make development easier, we put up a little local development framework on github. Here, we give you a little starting bot that randomly chooses somewhere to go, but always picks up a piece of fruit if he’s standing on it. We also mocked out the server in way to allow you to play against our “simplebot”. “simplebot” is really just a breadth-first search. It’s actually written recursively, though that seems to be okay for the given time and memory contraints given that boards can at most be 15×15 and have 25 items.

The bots written by our developers employ a number of different strategies. “fruitwalk-ab” tries to predict the opponent’s moves and does some minimax with alpha-beta pruning. “Blender” and “Flexo” mostly ignore the opponent and go by a number of heuristics trying to decide the best piece of fruit to go for at a given time. Some of our other developers prefer to remain hush-hush on how their bots are written.

We hope you enjoy our game; we’ve certainly enjoyed writing it. Read more about it here.

Why zooming on mobile is broken (and how to fix it)

Traditional zooming

In a standard PDF viewer, suppose you’re reading a two-column document and you zoom into the left column. Now suppose that the font size is still to small to read comfortably. You zoom in further:

What happens is that even though the font is now the size you want, it also cuts off the left and right half of the text.

Scribd’s new reflow zoom

With the new Scribd Android reader, what happens instead is this:

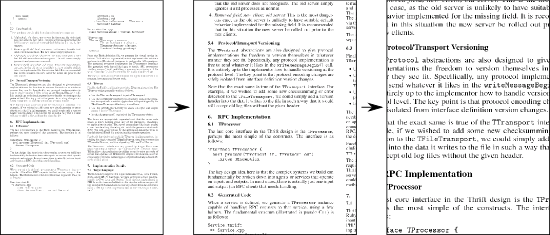
As soon as the left and right half of the text hit the border, the app starts ‘reflowing’ the text, nicely matching it to the screen size. Essentially, the document has been reformatted into a one-column document with no pagebreaks for mobile reading.

For a clearer understanding of what this means, please watch the video at the beginning of this post.

How it works

In order to render a ‘reflowed’ version of the document text, we have to analyze the document beforehand (we actually do this offline, on our servers).

In particular, we have to:

  1. Analyze the layout and detect the reading order of the text
  2. Detect and join back words where hyphens were used for line-wrapping
  3. Remove page numbers, headers/footers, table of contents etc.
  4. Interleave images with the text

I’d like to talk about at least two of them right here-

Detecting the reading order of the text

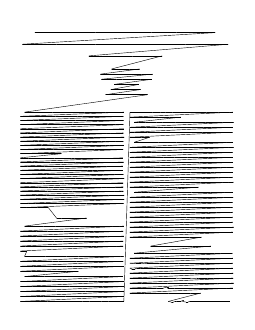
For starters, we need to figure out the reading order of the content on a page. In other words, given a conglomeration of characters on a page, how to “connect the dots” so that all the words and sentences make sense and are in the right order.

Thankfully, PDF tends to store characters in reading order in its content stream.
It doesn’t always (and what to do if it doesn’t is a topic for a whole blog post),
but when it does, determining the reading order is as easy as reading the index of
characters in the page content stream from the PDF.

Detecting hyphenation, and joining back words

Determining whether a hyphen at the end of a line is there because a word was hyphenated, or whether it’s just a so-called em dash is more tricky— especially since not everybody uses the typographically correct version of the em dash (Unicode 0x2014). Consider these example sentences:

The grass would be only rustling in the wind, and 
the pool rippling to the waving of the reeds—
the rattling teacups would change to tinkling sheep-
bells. The Cat grinned when it saw Alice. It looked good-
natured, she thought.

When implementing a algorithm for detecting all these cases, it’s useful to have a dictionary handy, (preferably in all the languages you’re supporting— for Scribd, that’s quite a few.) That allows you to look up that “sheep-bell” is a word, whereas “reedsthe” is not.

It’s even better if the dictionary also stores word probabilities, allowing you to determine that “good-natured” is more probable than “natured”.

Learn more

If you want to try this out for yourself, you can download our implementation
from the Android market.

Right now, we have a choice selection of books and documents that offer this functionality. Soon, we will roll it out to a major percentage of our content.

Matthias Kramm

What Start-Ups Like to See in Resumes from College Students and Entry-Level Candidates

This post was originally posted on jenny.webs.com.

Last week, I represented Scribd at my alma mater Carnegie Mellon’s job fair — the TOC. While the quality of students that we met were incredible beyond what our recruiters had expected, the overall quality of the resume writing was honestly atrocious. I’m sure college seniors feel like they don’t have a lot yet to put on a resume, but there are certainly ways to stand-out. This post is specifically about how to make your resume stand-out to a start-up.

Why a start-up? Start-ups are a lot of fun. The atmosphere is also closer to college life, which makes an easier transition. Working at a start-up is also a really great way to learn a ton since they are generally small with a lot of work and interesting problems. The start-ups I’ve worked at include Overture Technologieswebs.com, and now Scribd. The hours are extremely flexible (anything before 11am is considered “early”), the offices are filled with toys, snacks and drinks, and I really respected the intelligence, abilities, and passion of my co-workers. The last point goes to show why these companies look more for these qualities rather than for a list of skills. This post describes how to showcase these points on your resume.

List Personal Projects
Personal projects are a way to differentiate yourself from other candidates; they show that programming is part of who you are in life, not just your job. Personal projects can be as small and simple as a little game or a tutorial for a new language or framework you went through not because you needed to know it, but because you wanted to learn more about it. We weigh these things heavier than academic or work projects. I was flabbergasted to find that when I asked one student why his personal projects weren’t on his resume, he answered, “They weren’t real projects; I just did them for fun.” That is exactly the reason they should be on your resume! Not everyone programs for fun. We want people for whom programming is fun, not just work.

List Only Academic Projects that Differentiate You
Most companies send alumni back to represent them at college job fairs. Being a Carnegie Mellon School of Computer Science alumna, I could easily recognize all the academic projects listed on various students’ resumes. While “Diffusing a Binary Bomb” is really a great project and in fact the one I like to use as an example of why I thought our homework projects were really well-written, it is something that every CMU computer science student has to do. Meanwhile, projects in elective classes or ones where you must self-design your project helps a potential employer understand what sort of problems interest you. Specifying that it was an elective helps recruiters less familiar with various academic programs parse your resume.

Specify Links that Reference You and Your Work
Especially for college students, it is huge when we see someone who has a github account. Whether the github account shows original code, forked projects, or simply following other projects, it shows not only interest in the industry but also that you are already a part of the community. Links to projects are also useful; we can not only read about your work, we can see it first hand. Even links to twitter accounts or blogs are good as well. Particularly if you are applying to a social media start-up, it is good to see that you are a user of social media tools yourself and already have some domain knowledge.

List your Hobbies
We review so many resumes. Hobbies make us feel like you’re more of a person than just a list of skills and qualifications. It also may help us determine whether you’d be a culture fit with the company.

Realize the Skills List is Not the Most Important Part of Your Resume
While more traditional companies may look for a checklist of skills, this is not the start-up mentality; start-ups look for smart, passionate people who can learn and pick-up anything. I remember being an entry-level candidate and listing skills that I had, but didn’t really want to pursue at a company (like my sysadmin experience). I thought it was better to fill my resume with anything I could do rather than leave it off. As a result of course, I piqued the interest of several companies wanting me to do a role I was not interested in. I like to state it this way to candidates: if you are in the middle of figuring out a problem on Friday and you really have to leave work to go to a friend’s birthday dinner, what sort of problem would make you more likely to want to continue figuring it out over the weekend rather than waiting until Monday to get back to it? I’m not saying don’t like all the various skills you have, but know your passions and be sure to be forthright about what you are passionate about versus what you just “know how to do” or are simply “willing to do”.

The start-up hiring mentality is just different from the traditional hiring mentality; what your parents advise you or what your college teaches may not be applicable here. Passion, intelligence, and love of the industry are what matter. If you are looking to apply to both start-ups and non-start-ups, I actually advise you to make two different resumes that emphasize things differently and make your own choice on what type of company you prefer after you get to see their offices and meet the employees.

If you are interested in working at Scribd (located in San Francisco) or webs.com (located in the DC area), please check out their job pages at http://www.scribd.com/jobs and http://webs.com/Careers/.

Shrink your iOS app by turning PNG compression up to 11

This post was written by John Engelhart, an iOS developer at Scribd and author of the JSONKit library.

So you have a lot of PNG images in your iPhone app…

When I started here at Scribd, we were just a few weeks away from launching our first iPhone app– Float.

Being a new hire obviously meant that I didn’t know the code base. Being just a few weeks away from launch obviously meant that there was a strong focus and getting something out the door. So the first thing I did is start making huge, sweeping fundamental architecture changes like swapping out all the XML REST stuff with JSON, and switching the JSON parser that was currently being used with JSONKit, because JSONKit is really, really fast. Just look at those graphs! Does it happen to parse JSON correctly? Are numbers arbitrarily and silently truncated to 32 or 64 bits haphazardly? Are floating point values preserved correctly when round tripped? Who cares! That simple graph tells me everything I need about those complicated technical issues: it’s fast! Anyone who suggested this had anything to do with the fact that I was the author of JSONKit was quickly silenced…

Oh, no, wait… that’s right, that’s not the way it happened… In reality it was obvious that no matter how much I might like to contribute to getting the app out the door, odds were that I would either slow things down or screw something important up because of my unfamiliarity with the code base. One thing that caught my eye was that the application had a lot of PNG image assets, and in my various adventures in the great city of life, I knew that you could often easily make PNG images even smaller.

This seemed like a good project that I could work on:

  • It was independent of what everyone else was doing, so no one would have to stop and explain how something in the app worked.
  • It was something that would probably either work or it wouldn’t. It would also be pretty unambiguous about whether or not it was causing problems.
  • It could be easily and trivially backed out if a problem was found, even up until the very last second… as long as you kept the original PNG images, which seemed pretty obvious.
  • I could actually contribute to the app that was going to ship in a few weeks, even if it only meant that I “saved a few bytes that the end user has to download and takes up on their iPhone”.

Small details

In astronomy, you first enjoy three or four years of confusing classes, impossible problem sets, and sneers from the faculty. Having endured that, you’re rewarded with an eight-hour written exam, with questions like: “How do you age-date meteorites using the elements Samarium and Neodymium?” If you survive, you win the great honor and pleasure of an oral exam by a panel of learned professors.

I remember it vividly. Across a table, five profs. I’m frightened, trying to look casual as sweat drips down my face. But I’m keeping afloat; I’ve managed to babble superficially, giving the illusion that I know something. Just a few more questions, I think, and they’ll set me free. Then the examiner over at the end of the table—the guy with the twisted little smile—starts sharpening his pencil with a penknife.

“I’ve got just one question, Cliff,” he says, carving his way through the Eberhard-Faber. “Why is the sky blue?”

My mind is absolutely, profoundly blank. I have no idea. I look out the window at the sky with the primitive, uncomprehending wonder of a Neanderthal contemplating fire. I force myself to say something—anything. “Scattered light,” I reply. “Uh, yeah, scattered sunlight.”

“Could you be more specific?”

Well, words came from somewhere, out of some deep instinct of self-preservation. I babbled about the spectrum of sunlight, the upper atmosphere, and how light interacts with molecules of air.

“Could you be more specific?”

I’m describing how air molecules have dipole moments, the wave-particle duality of light, scribbling equations on the blackboard, and…

“Could you be more specific?”

An hour later, I’m sweating hard. His simple question—a five-year-old’s question—has drawn together oscillator theory, electricity and magnetism, thermodynamics, even quantum mechanics. Even in my miserable writhing, I admired the guy.

While “saving a few bytes” might seem trivial, small details like that matter to me. Whether or not someone is willing to pay attention to the small details can say a lot about them. The above quote from Clifford Stoll’s The Cuckoo’s Egg: Tracking a Spy Through the Maze of Computer Espionage is sort of like the culmination of a lot of small details– the sky is blue for a reason, often for seemingly trivial, small details… but those small details form a long, causally related chain. I think it also eloquently illustrates that while small details matter, knowing which small details matter is just as important, and the causal relationship between them. Just knowing that “Why is the sky blue?” is an interesting question can reveal just as much about someone.

There’s a lot of small, trivial details involved in something as simple as “optimizing an iOS devices PNG images”. For example, once Xcode.app has built the app, you can not modify any of the files in the applications bundle because that will invalidate its code signing. There’s also the small detail that the PNG images that end up in your applications bundle aren’t PNG standard conforming, but are actually an Apple proprietary PNG extension.

Turning iPhone PNG optimization up to eleven

Xcode.app has a build setting that you may not be aware of– Compress PNG Files, and for new Xcode.app iPhone projects it is set to Yes by default.

For the vast majority of projects the only time it is ever set is when the project was initially created… which is probably one of the reasons why you’ve never heard of it. If you did happen to notice the Compress PNG Files build setting, the only other option is No. Given these two choices, who wouldn’t want their PNG files compressed? Yes, please!

What it does

When you build your project, and the target is an iOS device, not the simulator, the Compress PNG Files build setting causes any PNG resources that are copied in to your applications bundle to go through a preprocessing step that optimizes them for iOS devices.

Apple has not published any of the details as to what it specifically means to “optimize a PNG image for iOS devices”, but others have reverse engineered at least some of it:

  • Extra critical chunk (CgBI).
  • Byteswapped (RGBA –> BGRA) pixel data, presumably for high-speed direct blitting to the framebuffer.
  • zlib header, footer, and CRC removed from the IDAT chunk.
  • Premultiplied alpha (color′ = color * alpha / 255).

Like gzip -9, except this one goes to gzip -11

Most PNG optimization tools tend to perform optimizations at the PNG level, such as:

  • Color reduction (i.e., 24-bit RGB to 256 indexed color conversion, etc).
  • Bit depth reduction (i.e., 8-bits per Red, Green, and Blue to 4-bits per).
  • Optimizing some of the zlib libraries user tunable settings.
  • PNG filter optimization.

The PNG standard specifies a number of predefined filters that can be applied to an image that can often improve compression. It’s difficult to tell in advance which filter will give the best results for a particular image, so PNG optimizers usually try several of them. As you can probably imagine, the number of combinatorial permutations of different options grows rather quickly, so there is usually an option to specify how many of the different permutations will be tried in an effort to optimize the PNG images size. As is often the case with such brute force techniques, the amount of time it takes to try the different permutations tends to grow exponentially, and the improvements gained for the extra effort tend to shrink inverse exponentially– the dreaded diminishing returns, where more and more work gets you less and less of an improvement.

One PNG optimization tool stands apart from the rest, however: the advpng optimizer from the AdvanceCOMP recompression utilities. This PNG optimizer does most of its optimization at the zlib level– instead of using the standard zlib library, it uses the RFC 1950 (the standard that defines the zlib compression format) implementation from 7-Zip / LZMA compression engine instead. Most of the time, the 7-Zip / LZMA RFC 1950 / zlib compression engine is able to do a better job, and thus produce a smaller compressed result, than the standard zlib library at its maximum compression setting.

However, the advpng tool does not perform any of the optimization strategies that the common PNG optimizers use, and in fact will undo any of the optimizations that they performed when it recompresses the result using the 7-Zip / LZMA compression engine. And you can forget about using it on quirky, proprietary PNG image formats that aren’t PNG standards compliant…

What would be great is…

The majority of a PNG image is contained in the IDAT chunk– it contains the actual pixels that make up the image. The IDAT chunk is compressed using standard RFC 1950 / zlib compression. What’s really needed is a tool that just recompresses the IDAT chunk chunk using the 7-Zip / LZMA compression engine, while leaving everything else unmodified.

Well, Good News, Everyone! Just such a tool exists: the advpngidat tool, which is part of Scribds AdvanceCOMP fork on github.com. Not only that, it happens to work correctly with Apples non-standard PNG format! This means you can make the PNG images in your iOS applications bundle even smaller. Naturally, your milage may vary, and it wont be able to make every PNG smaller, but it can usually compress your iOS PNG images an additional 5% – 7%.

Turning Xcode.app up to eleven

So how do you turn your iOS projects PNG compression up to eleven using Xcode.app? You use Scribds Xcode.app PNG optimizer enhancement, also available on github.com.

Important: Scribds Xcode.app PNG optimizer enhancement directly modifies configuration files that are private to Xcode.app!

While the Xcode.app PNG optimizer enhancement modifies private Xcode.app files, the changes it makes are relatively benign:

  • It modifies some .xcspec files that are used to enable the Compress PNG Files build setting in the GUI by changing the build setting from a boolean to a multiple choice.
  • It modifies some related files to modify and add descriptions that are displayed info help and info displays.
  • It modifies some perl and shell scripts that perform the actual copy and “optimize the PNG image for iOS devices” so that, depending on the additional build setting options, pass the optimized PNG image to advpngidat for additional compression.

The end result is this: The Compress PNG Files, which was a simple Yes / No boolean setting, turns in to a multiple choice build setting:

Setting Description
None Identical to the unmodified Compress PNG Files No setting.
Low Identical to the unmodified Compress PNG Files Yes setting. This uses the Apple proprietary version of pngcrush to optimize PNG files for iOS devices.
Medium The compressed PNG files from the Low setting are further optimized by the advpngidat command.
High The same as Medium, except a handful of carefully chosen -m compression methods that work much better in practice are used instead of the default heuristic used by pngcrush.
Extreme The same as Medium, except pngcrush is passed the -brute option which tries all of the compression method permutations.
Warning: This can take a very long time!

It even goes to twelve, but your puny iOS device can’t handle it…

Unfortunately, you should not use the High and Extreme settings. While iOS versions < 5.0 had no problems with PNG images compressed with either setting, iOS 5.0 will not correctly display PNG images compressed at either High or Extreme. Although it depends on the particulars of the image, some images will be displayed using the wrong colors. Of course, there could be other problems as well, as the image format is an unpublished, non-standard PNG extension.

That being said, the Medium compression setting seems to work just fine– the only optimization it does is recompress the IDAT chunk using a better RFC 1950 / zlib compression engine. Everything else in the PNG file is passed through unmodified.

Help fight random entropy!

Take a look at Scribds AdvanceCOMP fork and Xcode.app PNG optimizer enhancement (which requires the advpngidat tool from the AdvanceCOMP fork), both available on github.com. After reading the documentation, and assuming you’re comfortable with modifying some of Xcode.apps private files, install them both.

Once installed, simply set your Xcode.app iOS projects Compress PNG Files build setting to Medium, and do your part in the fight against random entropy!

Just how many useless bytes were saved?

Setting Size (bytes) Δ Low Δ Extreme
Low 9740448 100.0% 131.3%
Medium 8969108 92.1% 120.1%
High 7756942 79.6% 104.6%
Extreme 7418479 76.2% 100.0%

As previously mentioned, a problem was discovered with iOS 5.0 with some images compressed using either High or Extreme. This is most likely due to the fact that the Apple proprietary “optimized for iOS devices” format seems to only use a PNG filter setting of None. This means that the decompressed result can be used without any additional per-pixel filter processing.

So, in the end, we were only able to use the Medium setting, which only optimizes a PNG images IDAT chunk, leaving the rest of the bytes completely unmodified. Still, this resulted in a savings of 7.9%, which translates in to nearly 753K-bytes shaved off the final application bundle.

One more thing…

The advpngidat compression tool isn’t just for “optimized for iOS devices” PNG images, it can be used on regular PNG images too. This can be a useful addition to any work flow that passes PNG images through one of the common PNG optimization tools (i.e., optipng and pngcrush). As an example, any web site that has a large number of static PNG images can use a simple shell script to process all of the static PNG images with something like optipng, and then process the optipng results with advpngidat.

In fact, the advpngidat tool effectively does what is on the roadmap for the optipng tool:

  • Plans for version 0.8:

… which is exactly what advpngidat does today– the only “optimization” it performs is it recompresses the IDAT chunk using the “powerful 7zip deflation” compressor. If the recompressed result happens to be bigger than the original, then the PNG image is left unmodified. Otherwise, the PNG image is replace with the smaller, optimized result.

This is really something that every web site with static PNG images should do. You only need to perform the “optimization” on an image once, and every request for that PNG image after that point will use the smaller, optimized result. You don’t have to be a rocket scientist to figure out the benefits: less bytes to send means pages load that much faster, and if you happen to pay for the amount of bandwidth you use… it means a simple, one time run through advpngidat can save you real money.

Clean Up Your Project

This post was written by Sam Soffes, an iOS developer at Scribd, and originally posted on his blog here.

Many of the apps I work on are usually 100% custom. There is rarely any system UI components visible to the user. Styling the crap out of apps like this makes for tons of images in my iOS projects to get everything the way the designer wants. I’m starting to drawRect: stuff more these days because it makes it easier to reuse, but anyway.

There are literally hundreds of images in the Scribd app I’ve been working on. Designers changing their mind plus everything custom leaves a lot of images behind that are no longer used. Our application was starting to be several megs and a lot of it was unused images. So… being the programmer I am, I wrote a script.

desc 'Remove unused images'
task :clean_assets do
  require 'set'

  all = Set.new
  used = Set.new
  unused = Set.new

  # White list
  used.merge %w{Icon Icon-29 Icon-50 Icon-58 Icon-72 Icon-114}

  regex = /\[UIImage imageNamed:@"([a-zA-Z0-9\-_]+).png"\]/
  Dir.glob('Classes/*.m').each do |path|
    used.merge File.open(path).read.scan(regex).flatten
  end

  Dir.glob('Resources/Images/*.png').each do |path|
    next if path.include? '@2x.png'
    all << path.gsub(/Resources\/Images\/([a-zA-Z0-9\-_]+).png/, "\\1")
  end

  unused = all - used
  unused.each do |key|
    `rm -f Resources/Images/#{key}.png Resources/Images/#{key}@2x.png`
  end

  puts "#{all.length} total found"
  puts "#{used.length} used found"
  puts "#{unused.length} deleted"
end

It basically searches all of your source files for references for [UIImage imageWithName:@"image_name_here"]. Then it looks at all of the images on disk and removes any you didn’t reference. I setup a whitelist for icons and other images I don’t reference directly. You might need to tweak the paths a bit to work for your setup.

Hopefully this little rake task helps someone clean up their project too.

How to Drastically Improve Your App with an Afternoon and Instruments

This post is by Sam Soffes, an iOS engineer at Scribd, and was originally posted on his blog here

Recently I managed to make the Scribd iOS application way better with some simple tweaks. I wanted to write a quick post about what I did that really helped that will probably help most people. This stuff is a bit application specific, but I think you’ll see parallels to your application.

Symptoms

The Scribd application pulls a ton of data from the network and puts it in Core Data when you login for the first time. From using the application, I noticed that performance totally sucks at first and then goes back to normal. (My table views all scroll at 60fps, but I’ll save that for another post. Sorry. Had to throw that in there. I’m way proud.) This was troubling since it usually works really great, (okay, now I’m done bragging about my cells) so I investigated.

Just so you know, I am doing all of my networking, data parsing, and insertion into Core Data on background threads via NSOperationQueue.

The Problems

After running Instruments with the object allocations instrument, I noticed that I was using about 22MB of memory while it was downloading all of this data. In my opinion, that is way too high. I’ll add that to list of stuff to mess with.

I also noticed that my NSDate category for parsing ISO8601 date strings (standard way to put a date into JSON) was taking about 7.4 seconds using the timer instrument. Totally unacceptable. Added to the list.

After messing around for a little while longer, I noticed that a lot of time was being spent in one of my NSString categories, specifically in NSRegularExpression. This sounds annoying, so I’ll save that for last.

The Solutions

Memory

I had a few guess on how to cut memory usage while converting large amounts of JSON strings into NSManagedObjects. My guess was that a ton of objects needed to be autoreleased but the NSAutoreleasePool wasn’t being drained until the operation finished. The simple solution for this to add a well-placed NSAutoreleasePool around problem code. This took a few tries to get in the right spot. I would put it where I think most of the temporary objects were being created and then watch the object allocations instrument to make sure it got flatter.

Here was my first try:

First Try

See how it goes up and drops sharply down a bit and then builds up for awhile then finally drops off? That’s a sign there is another loop nested deeper down that should have a pool around it. For the first one, it did a little and then drained (probably because it did less stuff in that operation). Since the second giant hump (note the peak of that is 23MB or so) doesn’t drop off for awhile, I know to look for another loop deeper down. Hopefully that makes sense. Once you get in there, it will suddenly hit you after stumbling around for a bit. You’ll see.

After moving it to a more nested loop, here’s the result:

Second Try

Once I got it in the right spot, it was using under 2MB of memory for the entire process! Score! Next problem.

Date Stuff

The date stuff had me stumped for awhile. I was using ISO8601Parser (a subclass of NSFormatter) which was working really, really well compared to NSDateFormatter. After looking at timer instrument, I saw that most of that time was spent in system classes like NSCFCalendar. I assumed there was a better way. I tried switched back to NSDateFormatter, but that didn’t work well and still wasn’t great memory and speed wise.

As a disclaimer, I am all about Objective-C. I love it. I’m not one of those engineers that’s says “hey, we should rewrite this in C” all the time, but hey, we should rewrite this in C. I did… and the result was astounding!

Here’s the code:

#include <time.h>

+ (NSDate *)dateFromISO8601String:(NSString *)string {
    if (!string) {
        return nil;
    }
    
    struct tm tm;
    time_t t;
    
    strptime([string cStringUsingEncoding:NSUTF8StringEncoding], "%Y-%m-%dT%H:%M:%S%z", &tm);
    tm.tm_isdst = -1;
    t = mktime(&tm);
    
    return [NSDate dateWithTimeIntervalSince1970:t + [[NSTimeZone localTimeZone] secondsFromGMT]];
}


- (NSString *)ISO8601String {
    struct tm *timeinfo;
    char buffer[80];

    time_t rawtime = [self timeIntervalSince1970] - [[NSTimeZone localTimeZone] secondsFromGMT];
    timeinfo = localtime(&rawtime);

    strftime(buffer, 80, "%Y-%m-%dT%H:%M:%S%z", timeinfo);
    
    return [NSString stringWithCString:buffer encoding:NSUTF8StringEncoding];
}
view raw
date.m
This Gist brought to you by GitHub.

See, it’s not too crazy. Using the C date stuff took my date parsing from 7.4 seconds to 300ms. Talk about a performance boost! (I updated SSTookit‘s NSDate category to use this new code.)

Regular Expression

I have several NSString categories in my application for doing various things. Some of them were called throughout the process I was trying to optimize. I drilled down in the time profiler instrument and realized that [NSRegularExpression regularExpressionWith...] was taking a ton of the time. This totally makes sense, since it compiles your regex to use later and I was doing it each time. Simple solution:

- (NSString *)camelCaseString {
    static NSRegularExpression *regex = nil;
    if (!regex) {
        regex = [[NSRegularExpression alloc] initWithPattern:@"(?:_)(.)" options:0 error:nil];
    }
    
    // Use regex...
    
    return string;
}
view raw
string.m
This Gist brought to you by GitHub.

This was actually the easiest part 🙂

Conclusions

So using Instruments to track down slow or bad code is really easy once you get the hang of it. Start with the leaks instrument if you’re new. You shouldn’t have any (known) leaks in your application.

Once you get that down (or get so frustrated trying to track it down you give up and move to something else) do the object allocations instrument next. You can watch the graph and see how many objects you have alive. If you see a big spike that never goes down, you most likely have a ton of memory around that you probably don’t need but still have a reference to so it doesn’t show up in leaks. Adding autorelease pools around loops that do lots of processing always helps.

Finally, use the time profiler instrument to see what’s taking a long time and optimize the crap out of it. This is the most fun since it’s easy to see whats happening and how much of an improvement you made by the changes you just made. The key to making this instrument useful is the checkboxes on the left. Turning on Objective-C only or toggling the inverted stack tree is really useful.

This is Hard

Don’t feel bad, especially if you’re new to this. This stuff is hard. All of my solutions I listed above are pretty simple. I spent almost an entire day coming up with those few things. The majority of the time you spend will be tracking down problems. Fixing them is usually pretty simple, especially after you’ve done it a few times. This is hard. You’re smart. 🙂

FlashHeed: Fixing the Flash Z-index Problem For Ads

Here at Scribd, we’ve moved on from Flash and are embracing HTML5 as the open standard for reading on the web. Unfortunately, the ad industry has not quite caught up yet, as many ads are still flash, and probably will be for some time.

The dreaded problem that most web developers come across is the z-index issue with flash elements. When the wmode param is not set, or is set to window, flash elements will always be on top of your DOM content. No matter what kind of z-index voodoo you attempt, your content will never break through the flash. This is because flash, when in window mode, is actually rendered on a layer above all web content.

There is a lot of chatter about this issue, and the simple solution is to specify the wmode parameter to opaque or transparent. This works when you control and deliver the flash content yourself. However, this is not the case for flash ads.

The majority of flash ads don’t specify a wmode parameter, which will put flash into window mode. Why they don’t specify transparent or opaque is a mystery to me. This is a nightmare for pages that have UI elements that depend on z-index, like dropdown menus and lightboxes. Google even has an article about avoiding these sorts of elements altogether when they are in close proximity to ads.

I personally disagree with the notion of redesigning your UI because of display ordering issues with flash ads. It just doesn’t make sense from a product standpoint. And look! Even YouTube, owned by Google, has z-index flash issues with their own ads:

So, to solve all this, I wrote some javascript that will dynamically add the correct wmode parameter. I call it FlashHeed. You can get it now on the GitHub repo.

It works reliably in all major browsers, and has no dependencies, so feel free to drop it into your Prototype or jQuery dependent website.

The usage is simple: just include the FlashHeed javascript in the head of your page, and call it like so:


FlashHeed.heed();

And you’re done. All the flash ads on the page will now heed to the z-index ordering. No more embarassing lightbox and dropdown menu occlusions.

Under the hood, FlashHeed injects the correct wmode parameter and actually forces the flash to re-render. This is the only reliable way that I’ve found to kick the flash into the correct wmode.

Update 11/14/10:

Note that FlashHeed will not work on flash ads or elements that are embedded inside iframes, due to cross domain policies. Unfortunately, I don’t have a solution for those. If anyone has a suggestion, please comment below.

James Yu, Lead Developer at Scribd

Vanity Profile URLs in Rails

One feature shared by many social networking sites is "vanity" short profile
URLs. My Twitter page could have easily been the RESTfully predictable http://twitter.com/users/riscfuture, but thanks to short profile URLs it is http://twitter.com/riscfuture.

Even Facebook got in the game recently with their "Facebook Usernames" feature. Of course, in classic Facebook style, getting the vanity URL is a multi-step process with an application and the associated land-grab. At Scribd I kept it a little simpler, and I'm assuming you'd like to keep it simple for your Rails website as well.

In order for this system to work, we're going to have to lay down a few ground rules:

  • No user whose username conflicts with a controller name can have a short URL. You can't sign up on Scribd with the username "documents" and prevent anyone from seeing their document list.
  • No user whose username conflicts with another defined route can have a short URL. Remember that the routes file defines named or custom routes and resources, but with the default routes, normal controllers do not need an entry in that file.
  • Users with reserved characters in their names must have these characters escaped or dealt with. If I sign up with the username "foo/bar", that slash can't be left unescaped, or the router will misunderstand the address.
  • Usernames must be case-insensitively unique. Every browser expects scribd.com/foo to be the same as scribd.com/FOO.
  • Any user who cannot be given a short URL for the above reasons must have a fallback URL. This is where you fall back to your less pretty /users/123 URL. (Or perhaps /users/123-foo-bar for SEO purposes.)

Note that it's not enough to simply build a list of your controllers and stick them in a validates_exclusion_of validation. You want to be able to claim new routes for yourself even if users have already signed up with conflicting logins, and gracefully revert those users to a fallback profile URL.

Ultimately the question we need to answer is this: Given a user name, will a vanity URL conflict with an existing route? There are a lot of really hard ways of going about this, many of which will break over time. I opted to go with the a reliable (if somewhat slow) way of doing this: I build a list of known routes, strip them down to their first path component, then build an array of these reserved names. A known route might be, for instance, /documents/:id; its first path component is "documents." Thus, a user whose login is "documents" cannot have a vanity URL.

There are some points to note for this system:

  • You'll get a few false positives. If /documents/:id is a valid route, but /documents is not (say you had no index action), this system would still disallow a user named "documents". You can easily solve this by tweaking the code below, though.
  • No attention is paid to HTTP methods. Theoretically, if you had a route like /upload whose only acceptable method is POST, you could still use GET /upload to refer to a user named "upload". I have intentionally avoided doing this, however; good web design dictates that varying the HTTP method of a request only varies the manner in which you interact with the resource represented by the URL; a single URL should represent the same resource regardless of which method is used in the request.

In order to eke speed out wherever we can, we generate the list of reserved routes once, at launch, and cache it for the lifetime of the process. We do this in a module in lib/:

 
module FancyUrls
  def self.generate_cached_routes
    # Find all routes we have, take the first part (/xxx/) and remove some unwanted ones
    @cached_routes = ActionController::Routing::Routes.routes.map do |route|
      segs = route.segments.inject("") { |str, s| str << s.to_s }
      segs.sub! /^\/(.*?)\/.*$/, '\\1'
 
      # Some routes accept a :format parameter (ratings.:format).
      segs.sub! /\.:format$/, ''
      segs
    end
 
    # All possible controllers for /:controller/:action/:id route
    @cached_routes += ActionController::Routing.possible_controllers.map do |c|
      # Use only the first path component for controllers with multiple path components
      c.sub /^(.*?)\/.*$/, '\\1'
    end
    @cached_routes.uniq!
    # Remove routes whose first path component is a variable or wildcard
    @cached_routes.reject! { |route| route.starts_with?(':') or route.starts_with?('*') }
    # Remove the root route.
    @cached_routes.delete '/'
  end
 
  def self.cached_routes
    @cached_routes
  end
end

The top method combines two arrays: the first, a list of routes from the defined routes, and the second, a list of the app's controllers. It then filters out some non-applicable routes and stores the list in an instance variable. The list consists of only the first path component of a route.

The method is called generate_cached_routes because it's called when the server process starts, as part of the environment.rb file. The cached results are accessed with the cached_routes method.

So given this method, how do we test if a user is eligible for URL "vanitization?" It's simple:

 
module FancyUrls
  def user_name_valid_for_short_url?(login)
    not FancyUrls.cached_routes.include?(login)
  end
end

The method is simple: If the user's name is in our list of reserved routes, then it's not valid for URL shortening. Easy peasy.

So now we can reasonably quickly determine whether or not a user gets a vanity profile URL. The next step is to write a user_profile_url method that, given a user, returns either the vanity or full profile URL, as appropriate. To do this, first we will need to add our vanity URLs to the bottom of our routes.rb file:

 
# Install the non-vanity user profile route above the vanity route so people
# who don't have shortenable logins can still have a URL to their profile page.
map.long_profile 'users/:id', :controller => 'users', :action => 'show', :conditions => { :method => :get }
# Install the vanity user profile route above the default routes but below all
# resources.
map.short_profile ':login', :controller => 'users', :action => 'show', :conditions => { :method => :get }
 
# Install the default routes as the lowest priority.
map.connect ':controller/:action/:id'
map.connect ':controller/:action/:id.:format'

What's going on here? Well, at the very bottom of the routes.rb file, we are installing the old Rails standby, the :controller/:action routes. Newer Rails ideology is often to leave these routes out, so adjust your routes file as appropriate. Above those routes, but otherwise of the lowest priority, is our vanity route. Anywhere above that route is our traditional profile URL. (If you have a RESTful users controller, you could of course replace the top route with a resources call.)

At first glance there's a chicken-and-egg problem: We're checking if a user is "vanitizable" using the routes file, but now the routes file contains the vanity URL route. We solved this problem earlier in the generate_cached_routes method:

 
# Remove routes whose first path component is a parameter or wildcard
regular_routes.reject! { |route| route.starts_with?(':') or route.starts_with?('*') }

This line of code filters out any routes that start with a parameter or wildcard, among them the short_profile named route.

With the routes squared away, we move on to the problem of users with logins containing reserved characters. RFC 1738 defines what characters must be encoded in a URL:

Thus, only alphanumerics, the special characters "$-_.+!*'(),", and
reserved characters used for their reserved purposes may be used
unencoded within a URL.

Characters aside from these in usernames must either be encoded or otherwise dealt with. Beyond RFC 1738, we should additionally consider the dollar sign and plus characters ("$" and "+") reserved because they often serve special roles in URLs as well. And because this is a Rails app, we should consider the period (".") reserved as well, as it is used by Rails to indicate the format parameter.

So if a user has any reserved character in his login, what do we do? The obvious solution is to percent-encode it, creating a string like "foo%2Fbar", but some might find that ugly. You could also replace these characters with dashes (or some other stand-in character), creating "foo-bar", but then you run into trouble if someone actually signs up with the username "foo-bar". If you're making a new website, you may opt to disallow these characters from usernames. At Scribd we use a combination of approaches: Some reserved characters (like spaces) are simply not allowed in usernames; others are allowed but by using one of these characters you "give up" your vanity URL, instead using the fallback profile URL.

If you choose to allow certain reserved characters in your usernames, but disallow those people vanity URLs, you will have to modify the user_name_valid_for_short_url? like so:

 
def user_name_valid_for_short_url?(login)
  not (login.include?('.') and FancyUrls.cached_routes.include?(login))
end

This example allows users to have periods in their login, but disallows those users their vanity URLs.

With our vanity routes defined, we can implement the user_profile_url method:

 
module FancyUrls
  def user_profile_url(person, options={})
    login = login_for_user(person)
    raise ArgumentError, "No such user #{person.inspect}" unless login
 
    if user_name_valid_for_short_url?(login) then
      short_profile_url options.merge(:id => login)
    else
      long_profile_url options.merge(:id => person)
    end
  end
 
  private
 
  def login_for_user(user_or_id)
    return (if user_or_id.is_a?(User) then
      user_or_id.login
    else
      Rails.cache.get("login:#{user_or_id}") { User.find_by_id(user_or_id, :select => 'login').try(:login) }
    end)
  end
end

The method is simple enough: We check if the user an have a vanity URL, and if so, we return it; otherwise we return the standard profile URL. I included two small optimizations: We cache the login to avoid database lookups with each method call, and we only select the fields we care about from our users table.

And with that, we've got our URLs! Simply include your module as a helper and call user_profile_url to generate profile URLs as opposed to url_for or the named resource routes or whatever else you might have been using.

We're not quite done yet, though. What happens when a user who haplessly registered the username "ratings" gets screwed because we just launched our ratings feature? With the system I've shown above, the moment we deploy our new feature, any links to that user's profile page would automatically revert to the normal profile URLs.

Good web practice teaches us that when we change the URL for a resource, we should respond with a 301 to any client that tries to access the old URL. Obviously, since the /ratings URL now points to a different web page, we can't do that. Any users who visit external web pages and click a link to that user's profile URL will find themselves on your brand new ratings page. I have implemented no particular fix for this problem, as I believe most websites add very, very few controllers and named routes in comparison to the number of users they have. In other words, the problem is small enough that it's probably not worth solving.

We can solve the flip side of this problem, though: Once a website launches its vanity URL feature, there will still be bunches of external links to the old, longer profile URLs. We can respond to these requests with 301s to inform people that those links are now outdated. This also helps assist with SEO, getting people's new profile URLs on the Google index and getting the old ones off.

We do this by including code in the profile page's controller action to redirect if necessary:

 
class UsersController
  def show
    if params[:id] then
      @user = User.find(params[:id])
      return head(:moved_permanently, :location => user_profile_url(@user)) if user_name_valid_for_short_url?(@user)
    elsif params[:login] then
      @user = User.with_login(params[:login]).first || raise ActiveRecord::RecordNotFound
    else
      raise ActiveRecord::RecordNotFound
    end
  end
end

We have this if statement at the start of our show method because the method is doing double-duty: It responds to both the short_profile and long_profile named routes. In the former, the variadic portion of the URL is stored in the id parameter; in the latter, the login parameter. You could of course opt to dispatch the two URLs to two separate actions; either way, make sure you respond to unnecessarily long profile URLs with a 301.

And with that, you've got your vanity URLs. All it comes down to is a little bit of route-foo and some speed optimizations here and there. The solution here is tailored to the needs of Scribd; I've done my best to outline those needs and how they impacted our code. You should think about how you want to do vanity URLs on your website and take this code as a guide to implementing your own solution. Vanity URLs take a little extra time to implement, but in return you are rewarded with users who are more willing to share their profile pages, improved SEO, and that glowy feeling you get when you increase your site's Web 2.0-ishness.

Plan B: Font Fallbacks

This is the fourth post in our series about Scribd’s HTML5 conversion. The whole process is neatly summarized in the following flowchart:

In our previous post we wrote about how we encode glyph polygons from various document formats into browser fonts. We described how an arbitrary typeface from a document can be sanitized and converted to a so called “@font-face”- a font that browsers can display.

The next challenge the aspiring HTML5 engineer faces is if even after hand-crafting a @font-face (including self-intersecting all the font polygons and throwing together all the required .ttf, .eot and .svg files ), a browser still refuses to render the font. After all, there still are browsers out there that just don’t support custom fonts- most importantly, mobile devices like Google’s Android, or e-book readers like Amazon’s Kindle.

Luckily enough, HTML has for ages had a syntax for specifying font fallbacks in case a @font-face (or, for that matter, a system font) can’t be displayed:

    <style type="text/css">
    .p {
	font-family:
	    myfontface, /* preferred typeface */
	    Arial,      /* fallback 1 */
	    sans-serif; /* fallback 2 */
    }
    </style>

There’s a number of fonts one can always rely on to be available for use as fallback:

Arial (+ bold,italic)
Courier (+ bold,italic)
Georgia (+ bold,italic)
Times (+ bold,italic)
Trebuchet (+ bold,italic)
Verdana (+ bold,italic)
Comic Sans MS (+ bold)

(Yes, that’s right- every single browser out there supports Comic Sans MS)

However, it’s not always entirely trivial to replace a given font with a font from this list. In the worst case (i.e., in the case where an array of polygons for a subset of the font’s glyphs is really all we have- not all documents store proper font names, let alone a complete set of glyphs or font attributes), we don’t really know much about the font face at hand: Is it bold? Is it italic? Does it have serifs? Is it maybe script?

Luckily though, those features can be derived from the font polygons with reasonable effort:

Detecting bold face glyph polygons

The boldness of a typeface is also referred to as the “blackness”. This suggests a simple detection scheme: Find out how much of a given area will be covered by a couple of “representative” glyphs.
The easiest way to do this is to just render the glyph to a tiny bitmap and add up the pixels:

A more precise way is to measure the area of the polygon directly, e.g. using a scanline algorithm.

A mismatch between the area we “expect” e.g. for the letter F at a given size and the actual area is an indicator that we’re dealing with a bold face.

Detecting italic face glyph polygons

A trivial italic typeface (more precisely: an oblique typeface) can be created from a base font by slanting every character slightly to the right. In other words, the following matrix is applied to every character:

(  1   s  )
 0   1 

(With s the horizontal displacement)

In order to find out whether a typeface at hand is slanted in such a way, we use the fact that a normal (non-italic) typeface has a number of vertical edges, for example in the letters L,D,M,N,h,p:

In an italic typeface, these vertical edges “disappear” (become non-vertical):

In other words, we can spot an italic typeface by the relative absence of strict vertical polygon segments, or, more generally, the mean (or median) angle of all non curved segments that are more vertical than horizontal.

Detecting the font family

As for the actual font family, we found that two features are fairly characteristic of a given font:

  • The number of corners (i.e., singularities of the first derivative) of all the glyph outlines
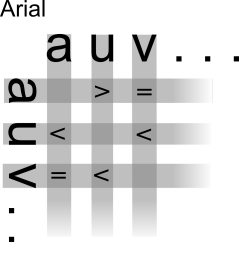
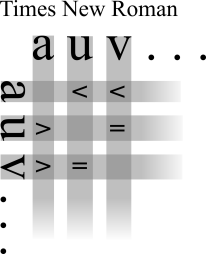
  • The sign of (w1-w2) for all pairs of glyphs with widths w1 and w2

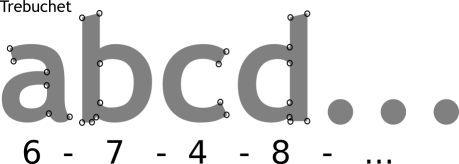
For example, displayed below are the corners of two fonts (Trebuchet and Courier) and the extracted feature string:

Of course, for a font to be mapped against a browser font, we typically only have a subset of n glyphs, hence we can only use the number of corners of a few glyphs.

The second feature, comparing signs of glyph-width differences, gives us more data to work with, as n glyphs generate n*(n-1)/2 differences (entries in the difference matrix, with the lower left half and upper right half symmetric):

Notice that we assume in our detection approach that we actually know what a given glyph represents (i.e., that glyph 76 in a font is supposed to look like an “L”). This is not always the case- we’ll write about that in one of the next posts.

Here’s a random selection of fonts from our documents (left) and the corresponding replacement (right):

Comparison of original font and new font

And, as always, if you want to see the results of these algorithms for yourself, just grab a PDF (or any other document format), upload it to Scribd, and then download it to a (non @font-face-enabled?) mobile device of your choice.

-Matthias Kramm